desktop vogging
part one
context
Recent developments in cinema and technology can be pragmatically categorised under the two broad banners of the 'digital' and 'interactivity'. These are two different though complimentary beasts and this tutorial demonstrates how low end digital tools can produce novel forms of interactive video (I'll leave the question of whether it's cinema for another occasion).
A vog is the video equivalent of a blog. Blogs are web journals or web logs, and are a self publishing phenomenon that is sweeping the webbed world. Blogs are characterised by their networked, writerly, open, linked and polyvocal qualities, and as blogs demonstrate, the power of the Internet is anchored in its ability to let others say. A vog is then an informal, personal, desktop authored, low bandwidth, interactive digital movie. A vog leverages the network as a positive condition of constraint so rather than wishing to be the full screen full motion video (aka TV) that film makers think they need, a vog seeks an alternative aesthetic derived from animation, experimental film, and new media.
Like blogs, vogs also tend to emphasise informal modes of shooting and cutting, and often develop a serial form where it is the ongoing history of the vog that helps contextualise any individual entry. A vog assumes that the natural habitat of networked video is a multiwindow environment and that the combination of images in time (montage) with multiple simultaneous views (collage) is a key trope of digital screen narration, expression and authorship (see for instance Manovich and Landow). Unlike much of what passes for interactive network video, a vog requires and assumes that Internet video is more than a digital stream which appropriates our browsers as televisual wannabes. A vog is an attempt to develop an interactive video vernacular for the network.
This means vogs have some relationship to cinema, the digital and interactivity, though these offer different and problematic specificities. Whether or not a vog is cinema, well, that's a question for elsewhere, but they're certainly part of the networked, remediated revolution.
What follows is a simple tutorial for how to make your own vog. Using a simple and readily available cross platform authoring tool the ability to layer video and stills, stretch images in time, and edit content will be demonstrated. What is crucial for the general project of a networked digital video practice is the realisation that, like HTML, this content can be written anywhere by anyone using simple desktop architectures. Vogging is a determindedly desktop practice, and one of the revolutions afforded by digital video will be such a writerly video practice. Video online is not flash.
This tutorial provides you with a 1 minute sound track (sourced from a free public archive), a 30 second video sequence, and several still images. The still images are in jpeg format, a common graphics format, and the soundtrack and video are already in QuickTime. The soundtrack was a MP3 file which has been saved as a QuickTime file to reduce file size. The video was shot on a domestic single chip DV camera and captured using Apple's iMovie, then exported as a QuickTime movie. It is just content I had to hand, so don't expect high production values!
To make the vog you are going to stretch one still image to match the duration of the soundtrack so that the image will be played for the entire minute, then add video as a layer over the still image. The first video layer will only appear for 30 seconds (the original duration of the video clip), and then this will be repeated and the embedded video will be stretched to match the duration of the soundtrack (1 minute). Finally, you'll repeat the video clip several times, as well as adding several smaller stills, ending up with a collaged and montaged movie.
note:to view screen shots of the items described just click on the thumbnail images provided, each will open in a new browser window at full resolution. All the screen shots are from a Macintosh running OS X, but all the menu items are in the same place, and do the same thing, in Macintosh classic and on Windows. Clicking on any of the QuickTime icons below will launch QuickTime Player and load a relevant completed example of the vog movie.
resources
|
download tutorial files mac .sit archive [696Kb]
download tutorial files pc .zip archive [688Kb]
QuickTime
|
All the resources you need for this tutorial are available via http://hypertext.rmit.edu.au/vog/tutorial/. To actually do the tutorial you will require QuickTime Pro 6 which you can purchase online at http://www.apple.com/quicktime/ (If you own a Pro version of QuickTime 5 all that is described here will work the same way.) While QuickTime is an Apple developed technology it is cross platform.
QuickTime Pro is the licenced version of QuickTime and is different to the version of QuickTime you can install on your computer (and is already installed on all Macintoshes) for free. For the cost of the registration (approximately sixty Australian dollars) you receive a licence code which unlocks the editing capabilities that are embedded within QuickTime Player, the standard QuickTime program to view QuickTime content. Keep in mind that anything made in QuickTime Pro can be viewed with the free player, which means even if you author interactive content using QuickTime Pro users only need Quicktime, and not the professional edition, to view your work.
As QuickTime is a track based architecture a QuickTime movie can contain numerous tracks of varying kinds. It is by using multiple tracks of multiple types and layering these tracks that basic time based collages can be built.
|
the soundtrack

|
1. Launch QuickTime Player, this program can be kept running at all times for this tutorial.
|

|
2. Open the sound file called sound.mov and play it (you don't have to play it but hey, let's at least listen to it). You can vary the volume, pause, play and do various other things using the player. For instance you can make movies run at double speed, backwards, loop, and loop a selection, amongst other things. To learn more about controlling video and audio playback using the QuickTime Player have a look at [need url], but we're building content, not dagging around with an application!
|

|
3. Leave the soundtrack open in the Player.
|
the picture
|
|
1. From within QuickTime Player have a look under the File menu and select
Open Movie in New Player. . .
|

|
2. In the directory dialog box that opens (the thing that lets you find your files on your computer) navigate to where you've stored all the stuff for this tutorial, and select the file called bush.jpg. This is a photograph of some Australian bush and though it is just a still photograph (in JPEG format) QuickTime can read it and can treat it as if it were a movie. So select the photo and open it.
|

|
3. Now, you should have two files open in QuickTime Player (two windows). One contains the soundtrack and one contains the picture. The picture's pretty big so might be obscuring the soundtrack, so use the Window menu to check that there are two files open.
If there isn't then you can edit the QuickTime Player preferences so that new movies always open in new windows, rather than closing the current window and only letting you have one QuickTime movie open at a time. To vog you need to get used to having 2 or 3 or 4 movies open in QuickTime Player at the same time.)
|
adding the picture to the soundtrack

|
1. Make sure the picture is the active window in QuickTime Player and under the Edit menu select
Copy
This means we've copied one frame of the picture into the computer's memory, which of course also means we can paste it somewhere else. . .
|

|
2. Now make the soundtrack movie (sound.mov) the active window in QuickTime Player (click on it if you can see it to make it active, or use the Window menu and just select its name).
|

|
3. Under the Edit menu select
Select All
|

|
4. You should now notice that the controller timeline is a darker shade of grey, and that there's a little triangle at the beginning of the controller timeline and at the end (these are edit in and out points). By choosing Select All you have selected the entire duration of the soundtrack.
|

|
5. Now, the simple but tricky part. Have a peek under the Edit menu and you'll notice an item called Add Scaled see it? Have another look and choose it. (If you can't see it then you don't have QuickTime Pro and can't do this sort of editing).
|
|

|
6. And presto (your degree of presto-ness will vary depending on how fast your computer is) your still image of the bush is now in your soundtrack movie, with the soundtrack. Click the controller play button and you'll notice that you now have a soundtrack with a single image for its entire minute.
Simple, isn't it? And yes, if you moved one of the edit in or out points on the sound track timeline (or both of them) before you pasted the image using Add Scaled (from under the Edit menu) then the image would only appear during the duration selected. Not quite clear? Ok, that controller timeline with the darker shade of grey, that's how much of the movie (in this case our soundtrack movie - sound.mov) you have selected. So that's how much of that movie will have whatever you're about to do (paste a still image) applied to it. Does that mean you could paste 4 different images with adjoining in and out points so that you have a slide show? Yes.
But wait, there's more. You might be wondering why you would do this in QuickTime Pro when Adobe Premiere, Final Cut Pro, Media100, or an Avid can do this too. Two reasons. The first is to remember that this software cost you sixty Australian dollars and will run on any contemporary computer. The second is that all those video editing programs can't actually do what you've just done. What they all have to do, since they assume tape as your publication or delivery medium, is to redraw the same image at 24 or 25 frames per second for 1 minute, resulting in a very large file. What QuickTime Player does is assume that the computer is your delivery medium, and so rather than redraw the image 1,440 times (24 times a second for 60 seconds) it draws it once and just holds the one image for 60 seconds. This makes it extremely efficient, and effective, for online delivery and with 60 seconds of image the sound.mov file is now only the size of our original soundtrack plus our single image file.
|
adding video to our soundtrack
|
|
1. Under the File menu select
Save As. . .
2. And give your new movie a new name. Give it a new name so that the sound.mov remains untouched since we want to keep working and you might want to reuse the soundtrack again later on.
|
|

|
3. Now after you've chosen File Save As. . . you'll notice you've got two options, one is
Save normally (allowing dependencies)
And the other is
Save movie self contained
Don't be fooled by the file size differences into thinking that saving normally with dependencies means you're going to end up with this really tiny file to put on the Internet. What the dependencies option means is that you're saving a version of the movie that contains within it pointers to where the 'real' movie with the 'real' data lives. So if you save a movie with dependencies and then removed, deleted, renamed, moved or otherwise did something unwise with the original files then your new slim file simply will not run. Full stop. So save the movie as self contained which means all the digital bits and bytes it needs to run are in the one file and it's going to work all of the time. (Of course you may be wondering why this option is even there and the answer is pretty simple. If you could imagine a QuickTime movie that was, say, 30 minutes long where you might want to refer to different parts of this movie or even the entire movie in different places in a document, for instance an interactive CDROM, then instead of having to repeat all of the movie data each time you can include all the data once and then just use these 'reference' movies to point to the movie and its parts as often as needed.
4. So give it a new name (myvog.mov sounds good) and make sure you save it as a self contained movie.
|
|
|
5. Now, under the File menu select
Open Movie in New Player. . .
|
|

|
6. And in the directory dialog box that opens choose the file that's called waves.mov. This is a 30 second QuickTime movie of some waves under a pier that's been compressed down very hard. We want to take this 30 seconds of video and add it into our myvog.mov file and we're going to do this in much the same way that we added the still image earlier.
|
|
|
7. So, make sure waves.mov is the active window in QuickTime Player, and under the Edit menu select
Select All
|
|

|
8. And the controller timeline in waves.mov should now be that darker shade of grey. In case you're wondering, we have selected all of this movie (all of its timeline) because we want to copy all 30 seconds of this movie.
|
|
|
9. Under the Edit menu select
Copy
And just like with the still image, you've now selected and copied 30 seconds of video ready for pasting somewhere else (you can cut and paste and copy and paste QuickTime content just like you can words in a word processor, so yes, if you want you can edit the wave movie).
|
|
|
10. Make the myvog.mov file the active one in QuickTime Player. Now we need to be a bit careful. If we select all of the myvog.mov timeline (as we did for the wave movie in (8) above) then our 30 seconds of video will be stretched to 60 seconds (because that's how long the myvmog.mov movie runs), which can be fun (it is fun with soundtracks, you can stretch their duration to get rather interesting effects with the added benefit that no one can actually tell what the sound is), but that is not what we're doing. Instead, make sure none of the controller timeline is that darker shade of grey (if you're not sure then under the Edit menu select Select None).
11. Time to practice your mouse skills. Click on the small triangle that is under the controller timeline. These are the two triangles that set in and out points - the left one is the in point and the right one is the out point. Drag the right hand one and you'll notice that it leaves in its trail that darker shade of grey in the controller timeline. This is the part of the movie (myvog.mov) that is being selected. You'll also notice as you do this that some numbers change just to the left of the controller timeline. This is, of course, timecode.
12. Move the right triangle (the out point) until it is 45 seconds into the movie. Move the left triangle (the in point) until it is 15 seconds into the movie. This means that the selected duration of the movie is 30 seconds. (It can be hard to be frame perfect using just QuickTime Player. You can do it but accepting some latitude is a better way to go).
|
|
|
13. Now, under the Edit menu once again select
Add Scaled
|
|

|
14. And we have another presto moment. First, under File choose Save (no need to Save As. . . we're now working on myvog.mov which is our vog movie, but I'll come back to this later) so that nothing is lost if your computer crashes.
|
|

|
15. Play your movie. Pay attention because once your movie gets to that 15 second mark the wave movie should appear, and then once it passes that 45 second mark the wave movie will disappear. You've just embedded 30 seconds of video into a 1 minute movie.
Now, this 30 second insert is probably right up the top left of the picture of the bush, which is not what I'd call aesthetically satisfactory. So it's time to move it.
|
moving the video image
|

|
1. Make sure that in myvog.mov you are at a point in its timeline where you can see the waves video, because we're going to move it and we can only move it if we can see it, and you can only see it if you're at some point in your movie where it is playing (which should be somewhere between 15 and 45 seconds in the timeline). If the wave video that has been added is not visible then it will be because you are at a point in the timeline of your movie which is outside of the 30 seconds that the wave video has been pasted into. Simply play your movie (click on the play button) and when the wave video appears stop your movie. You will now be able to move it.
|
|

|
2. Under the Movie menu choose
Get Movie Properties
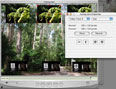
3. This opens up a very useful window that lets you see all sorts of things about your (and anybody else's) movie. At the top left it should say Movie, if you click on this to get the drop down menu it will list Sound Track, Video Track 1 and Video Track 2. That's because your vog currently has two video tracks (the bush image and the wave video) and one soundtrack. Now, select Video Track 2 (the video tracks are listed in the order in which they've been added to the movie) and then on the right, where it says Annotations, select Size from the drop down menu.
This tells the QuickTime Player that you want to manipulate the size of video track 2 in your movie.
|
|

|
4. In the Movie Properties window you should now see something that describes the size of the video track (120 x 68 pixels), a button called Adjust, one called Normal (that is greyed out and unavailable) and then various arrows.
These controls let you move the nominated video track (Video Track 2). The arrows do things like flip the video, reverse it, and the like. (Of course you could do the same with Video Track 1 if you wanted.) Click on the Adjust button and have a peek at your video. There should now be some handles appearing on the waves video inside your vog. This indicates that the wave video track is ready to be moved. Each of the handles do different things to your video, for instance skew it, shrink it, enlarge it, and rotate it around an axis. We just want to move it, so if it goes skew-whiff just use the Edit menu and choose Undo and things should be OK.
Click inside the myvog.mov window to make it active (the Movie Properties window is currently active) and then can click and drag inside the waves video to move it around the movie window. Do not click on the actual visible handles when you try to do this as this will skew or resize the video window. Just clicking inside the waves window within the handles will let you click and drag the waves video within the larger movie frame. If this is hard to do simply use the keyboard arrow keys to move the waves video.
5. Drag it to the centre. Click on the Done button in the Movie Properties window (Adjust becomes Done when you're adjusting and Done stops the adjusting).
|
|

|
6. Play your movie, and what should happen is that the waves now appear in the centre of the movie window for its 30 seconds.
|
|

|
7. Now under the Edit menu select
Delete Tracks. . .
|
|

|
8. And in the window that opens select and delete Video Track 2.
You've just removed the wave video from your movie!
|
stretching the video's duration
|
|
1. Once again open the waves video (waves.mov) if it isn't already open.
2. Select all of it and Copy (that's all under the edit menu).
3. Make your vog movie the active movie so that myvog.mov is the front most window. Select all of myvog.mov (so rather than using the in and out points to select 30 seconds select the entire 1 minute of the movie). Then use the Add Scaled. . . item under the Edit menu to paste in the content from the waves.mov movie. This means we've repeated what we did in the previous part but we've now stretched the duration of the waves video to 60 seconds.
4. Repeat this 2 more times, so that you will have added the waves video 3 times to myvog.mov.
|
|

|
5. Now, open up the movie properties window (if it isn't already open) and notice that there are now 4 video tracks in our vog.
6. Select Video Track 4 from the list (we're going to start from the bottom and work up because each of the 3 tracks we've added are literally sitting on top of each other).
|
|

|
7. In the right hand side of the Movie Properties (where it says Annotations) choose Size, and then click the Adjust button.
8. Click inside the wave movie (it now has the handlers visible inside it, if it doesn't then you're not adjusting the video track that is front most). Move this to the lower right of the window and repeat this for the other two wave video tracks so that you have a row of three video windows evenly spaced across the bottom of your movie (if one is in the wrong spot just select it in the Movie Properties window and adjust it again).
|

|
9. Save the file and you now have a vog with a sound track, a still image background and three repeated video tracks.
|
adding some stills
|
|
1. The last thing to do is to add a small still image 3 times (to mirror the video) evenly across the top of the movie for the duration of the entire movie. The still image is called fern.jpg and I'm sure you can now do this with your eyes closed, but just in case.
|
|

|
2. Open fern.jpg from QuickTime Player, and copy it (you don't need to Select All since it's a still image and whether you choose 1 frame or 20 makes no difference). Oh and you'll find Copy under the Edit menu!
|
|
|
3. Then make sure myvog.mov is the active window in QuickTime Player and make sure you have selected all of it (under Edit then Select All) so that the controller timeline is that darker shade of grey.
|
|
|
4. Under the Edit menu select Add Scaled and do this 2 more times so that you've pasted the fern image in three times, just as you did with the wave video.
|
|
|
5. From the Movie Properties window (from the Movies menu) you will now notice that another 3 video tracks are present. Simply work your way up from the bottom (Video Track 7 to Video Track 5) to adjust the physical location of each of the images, just as you did when you moved the wave video. Align them equally across the top of the movie.
6. Save your work.
7. Not very attractive is it? The images are too heavy up there, so perhaps moving them down to where the waves are, and moving the waves up to where the ferns are might work. But wait, let's layer it instead.
|
layering tracks
|


|
1. Using the Movie Properties window first of all select the video track that is the top left image of a fern (its one of Video Track 5, 6, or 7, it ought to be 7 since that's the last one added).
2. Click the Adjust button under Size (in the Movie Properties) so that you can move it. Drag it down so that it's outline neatly lies over the wave video below it.
3. Click Done in the Movie Properties window, and don't panic if the wave video has now disappeared under the picture of the fern.
4. Do the same for the other two images of the ferns, moving each down over its corresponding wave video.
|
|


|
Remember that QuickTime has tracks, well tracks are drawn on different layers, which means if we change the layer order of different tracks we can put tracks on top of each other but allow the smaller one to be not obscured by a larger one.
5. To do this once again use the Movie Properties window, and select a video track from the left drop down menu and on the right choose Layer. (You'll notice that it says that a smaller number brings a layer closer to the front.)
6. Since the wave video is the smaller of the images we're layering we need that to be the most front, so simply select Video Track 2, 3, and 4 in turn (they must be the wave video since we added these in turn at the beginning) and make them all have a layer of -10 (this is an arbitrary number but it's good to keep some distance between layers, so rather than have one layer -5 and another -6 it's better to go -10 and perhaps -1).
|
|

|
7. Then for Video Tracks 5, 6, and 7 set their Layer to -1.
|
|
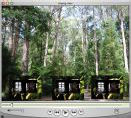 View completed vog View completed vog
|
8. The final thing to do is to once again save the work, but now as we did earlier select File Save As. . . and choose Make movie self-contained.
9. This will make a new movie will all the information needed for it to run nicely bundled up inside the one file. Not making it self contained can mean that the our final movie relies on the files we pasted into the movie still being on the computer for the movie to play. Making the movie self contained forces QuickTime Player to collect all the content it needs to play this movie and store it in the one file.
When saved it will probably be around 1MB in size. This movie can be played on Macintosh's and PC's with QuickTime installed and you can even embed it on a web page if you wish.
You now have video layered on top of a still image, in turn layered over a large still image, with a sound track. You can move these layers around if you like, and in case you haven't realised, there is no reason why you can't layer video over video. The video that you place within a vog can of course be edited before hand (and if you lack the tools you can do a very crude cut using just QuickTime Player) and you can add multiple layered soundtracks, still images, and video tracks. It is this organising in time (montage) with simultaneity in space (collage) that is one of the hallmarks of digital video as a writerly desktop practice, and the purpose of this essay come tutorial is to help show how simple it is to make such work.
However, you will notice that something is still missing from our vog, and that is interactivity. For this we need to use QuickTime text tracks and some HyperText Markup Language (HTML) and another tutorial showing how to use text tracks online with this vog will be in part two of desktop vogging. Coming soon . . .
|
Adrian Miles teaches and researches hypertext, cinema, interactive cinema and hypermedia at RMIT, Melbourne, and at InterMedia, Bergen. He consults on hypermedia pedagogy, emergent pedagogies, and interactive video. His vogs can be found at http://hypertext.rmit.edu.au/vog/ and his blog at http://hypertext.rmit.edu.au/vog/vlog/
